Quantcast
Channel: Arduino-Pi Ramblings
Viewing all 47 articles
Browse latest View live

PenguinBot Self Defence - or How to Arm a Penguin

$
0
0


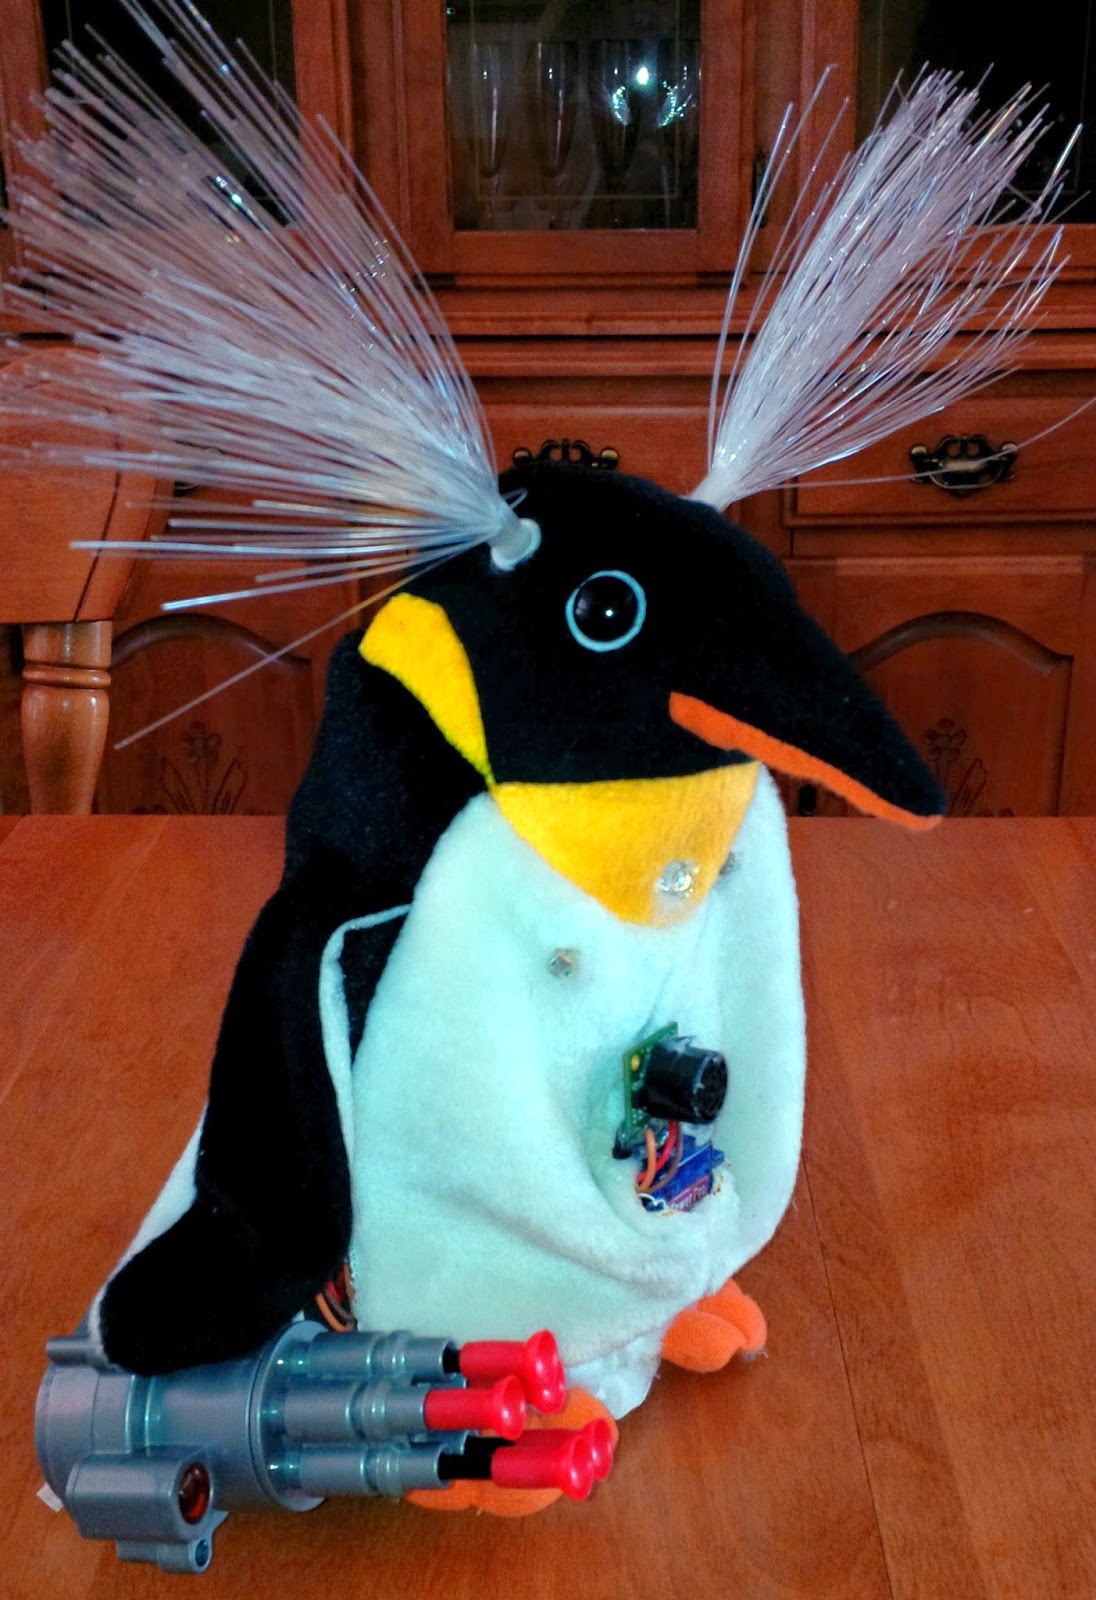
Over on Hack-A-day, one of the readers joked that I should have Nerf Launchers on the PenguinBot:


And given that today *IS*World Penguin Day , I thought I would spend some time this weekend to add some more playfulness to PenguinBot.
(Disclaimer: I am not affiliated with World Penguin Day or GreenPeace. I apologise if you find this article is in poor taste.)

In a previous update, I had mentioned that I was working on changing Operating Modes from full manual, to Wandering with Object Avoidance, to Following a light with sound activation or Hand Claps.  

I live in a house with three young children...  There is no such thing as "Ambient Sound" in my house to set a reasonable threshold.  (Seriously!!!) 


Additionally, Penguins were not meant to be tethered!  Not even for programming! 

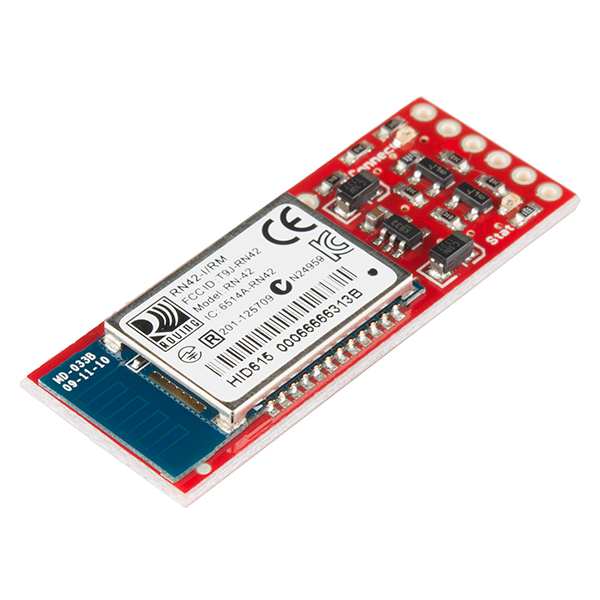
So... I've installed Bluetooth!  

I can now command this Penguin from the comfort of my chair! 


And to appease the readers of Hack A Day ....  
I'm installing a Penguin Self Defence system. 

No more will my PenguinBot be at the mercy of marauding sharks! 

I found this in my junk drawer.  I believe it came off of a kids remote  control car. It has a simple geared DC motor.
As I only need to run it in one direction, I can turn it on and off with a transistor.  


As you can see here, the Nerf Launcher fits nicely on the opposite side as the battery pack.  AND as an added bonus, it offsets the weight of the batteries which had the annoying effect of causing the forward motion to pull to the left. 

Below find the new and improved schematic diagram of PenguinBot V2.0.


I will be wiring this up over the weekend, adding some sequencing to randomly shoot in the direction of bright lights, and uploading the videos.

Cheers, and have a great weekend.  You bet I will...


References:
http://worldpenguinday.com/
http://playground.arduino.cc/Learning/Tutorial01
http://www.instructables.com/id/Android-talks-to-Arduino/
http://learn.adafruit.com/downloads/pdf/adafruit-arduino-lesson-13-dc-motors.pdf
https://sites.google.com/site/stembotics/projects/bluetooth
http://en.wikipedia.org/wiki/Obstacle_avoidance
http://www.instructables.com/id/Arduino-Object-Avoidance-Robot/


Arduino Sketch to manage high resolution - high speed linear encoders

$
0
0

In the ongoing saga of building my RepStrap 3D printer from salvaged printer parts...

The first axis is sorted out:


This is the printhead carriage salvaged out of a inkjet printer.  It basically consists of a DC gear motor driving a tensioned belt, pulling the print carriage across a high resolution optical encoder strip


There have been plenty of people do this before me, but this is my kick at repurposing salvaged printer parts.  


This is the print head circuit board from the carriage.  In the center, you will see the solder pads for the Optical Encoder Sensor.  My original intent was to keep the flat cables intact, and pull the signals off of those, but at about 50mil pitch... I can't even think about soldering that... 
(yeah, I'm getting old)

As they have already done the work of wiring the IR LED with a resistor to VCC, all I really need is four wires.  VCC/GND/Encoder Phase A and B. 
The Optical Encoder provides logic level outputs to the Interrupt pins on the Arduino.  The sketch below only addresses the X-AXIS for demonstration purposes, and only uses one Interrupt on Phase A, while polling the signal level on Phase B.  This provides half the resolution capable from this Quadrature encoder. 

In a future article, we will demonstrate using PinChange Interrupts to get the full resolution from this arrangement.

/***************************************************************************************
*  Lin_Enc_01.ino   04-29-2014   unix_guru at hotmail.com   @unix_guru on twitter
*  http://arduino-pi.blogspot.com
*
*  This sketch allows you to run two salvaged printer carriages for X/Y axis using their 
*  linear encoder strips for tracking. 
*  Both interrupt routines are below, but for the sake of demonstration, I've only set up
*  the X-AXIS for now.
*
*****************************************************************************************/

#include <Wire.h>
#include <Adafruit_MotorShield.h>
#include "utility/Adafruit_PWMServoDriver.h"

#define frontstop = 100            // Right most encoder boundary
#define backstop = 3600            // Left most encoder boundary


// Create the motor shield object with the default I2C address
Adafruit_MotorShield AFMS = Adafruit_MotorShield(); 

// Select which 'port' M1, M2, M3 or M4. In this case, M1
Adafruit_DCMotor *myMotor = AFMS.getMotor(1);


const int encoder1PinA = 2;        // X-AXIS  encoder 1 on pins 2 and 4
const int encoder1PinB = 4;
volatile int encoder1Pos = 0;

const int encoder2PinA = 3;        // Y-AXIS  encoder 2 on pins 3 and 5
const int encoder2PinB = 5;
volatile int encoder2Pos = 0;

boolean CarriageDir = 0;           // Carriage Direction '0' is Right to left
byte spd = 220;                    // Carriage speed from 0-255
int newpos = 0;                    // Taget position for carriage
int posrchd = 1;                   // Flag for target reached

int Pos1, Pos2;


void setup() {
  Serial.begin(115200);
  Serial.println("Linear Encoder Test  04-29-2014");

  AFMS.begin();  // Set up Motors
  
  myMotor->run(BACKWARD);        // Bring carriage to home position. 
  myMotor->setSpeed(spd); 
  delay(100); 
  myMotor->run(FORWARD);        // Bring carriage to home position. 
  myMotor->setSpeed(0); 
  
  attachInterrupt(0, doEncoder1, CHANGE);  // encoder pin on interrupt 0 (pin 2)
  // attachInterrupt(1, doEncoder2, CHANGE);  // encoder pin on interrupt 1 (pin 3)
  
  randomSeed(analogRead(0));
}

void loop() {
static int oldPos1, oldPos2;
uint8_t oldSREG = SREG;

uint8_t i;

  cli();
  Pos1 = encoder1Pos;  
  Pos2 = encoder2Pos;
  SREG = oldSREG;
  
  if(Pos1 != oldPos1){
     Serial.print("Encoder 1=");
     Serial.println(Pos1,DEC);
     oldPos1 = Pos1;
  }
  if(Pos2 != oldPos2){
     Serial.print("Encoder 2=");
     Serial.println(Pos2,DEC);
     oldPos2 = Pos2;
  }  
  

  //sweep_carriage();
  
  if(posrchd) {                           // If target has been reached clear flag, and get new target
    newpos =  random(200,3500);
    posrchd = 0;
  }    
    
  posrchd = go_to_target(newpos);
  
}


/***************************************************************************************
The following code was taken from   http://forum.arduino.cc/index.php?topic=41615.20;wap2
to utilize the fast port based encoder logic.  Thank you Lefty!
please go there for a full explanation of how this works.  I have truncated the comments 
here for brevity.
***************************************************************************************/
void doEncoder1() {                                  // ************** X- AXIS ****************
    if (PIND & 0x04) {                              // test for a low-to-high interrupt on channel A, 
        if ( !(PIND & 0x10)) {                      // check channel B for which way encoder turned, 
           encoder1Pos = ++encoder1Pos;               // CW rotation
           PORTD = PIND | 0x40;                     // set direction output pin to 1 = forward, 
          }
        else {
           encoder1Pos = --encoder1Pos;               // CCW rotation
           PORTD =PIND & 0xBF;                      // Set direction output pin to 0 = reverse, 
          }
    }
    else {                                          // it was a high-to-low interrupt on channel A
        if (PIND & 0x10) {                          // check channel B for which way encoder turned, 
           encoder1Pos = ++encoder1Pos;               // CW rotation
           PORTD = PIND | 0x40;                     // Set direction output pin to 1 = forward, 
           }
        else {
           encoder1Pos = --encoder1Pos;               // CCW rotation
           PORTD =PIND & 0xBF;                      // Set direction output pin to 0 = reverse, 
           }
         }
    PORTD = PIND | 0x80;                            //  digitalWrite(encoderstep, HIGH);   generate step pulse high
    PORTD = PIND | 0x80;                            //  digitalWrite(encoderstep, HIGH);   add a small delay
    PORTD = PIND & 0x7F;                            //  digitalWrite(encoderstep, LOW);    reset step pulse
}                                                   // End of interrupt code for encoder #1
                                                   
void doEncoder2(){                                  // ************** X- AXIS ****************
  if (PIND & 0x08) {                                // test for a low-to-high interrupt on channel A, 
     if (!(PIND & 0x20)) {                          // check channel B for which way encoder turned, 
      encoder2Pos = ++encoder2Pos;                  // CW rotation
      PORTB = PINB | 0x01;                          // Set direction output pin to 1 = forward, 
     }
     else {
      encoder2Pos = --encoder2Pos;                  // CCW rotation
      PORTD =PIND & 0xFE;                           // Set direction output pin to 0 = reverse, 
     }
  }
  else {                                            // it was a high-to-low interrupt on channel A
     if (PIND & 0x20) {                             // check channel B for which way encoder turned, 
      encoder2Pos = ++encoder2Pos;                  // CW rotation
      PORTB = PINB | 0x01;                          // Set direction output pin to 1 = forward, 
      }
     else {
      encoder2Pos = --encoder2Pos;                  // CCW rotation
      PORTB =PINB & 0xFE;                           // Set direction output pin to 0 = reverse, 
     }
  }
  PORTB = PINB | 0x02;                              // digitalWrite(encoder2step, HIGH);   generate step pulse high
  PORTB = PINB | 0x02;                              // digitalWrite(encoder2step, HIGH);   used to add a small delay
  PORTB = PINB & 0xFD;                              // digitalWrite(encoder2step, LOW);    reset step pulse
}                                                   // End of interrupt code for encoder #2


/***************************************************************************************
go_to_target() determines the distance and direction from current position to target 
position, then maps speed to decellerate close to the target so as not to overshoot.
***************************************************************************************/


int go_to_target(int target)
{
  int temp = 0;
  int delta = abs(Pos1-target);                   // Distance to target
  spd = map(delta,3600,0,255,150);                // Decellerate as you get closer
  if(target < 3600 && target > 100) {
     if(Pos1 < target) {
       myMotor->run(FORWARD);
       myMotor->setSpeed(spd); 
       temp = 0;
     } else if(Pos1 > target) {
       myMotor->run(BACKWARD);
       myMotor->setSpeed(spd); 
       temp = 0;
     }  else temp =1;
  }
  return temp;
}


/***************************************************************************************
sweep_carriage() is just a test routine to track back and forth testing overshoot. 
I will likely remove it soon.
***************************************************************************************/

void sweep_carriage()
{
    if(CarriageDir == 0) {              // Carriage Moving Right to Left
    if (Pos1 < 3600) {      
      myMotor->run(FORWARD);
      if (Pos1 > 3400) { 
       myMotor->setSpeed(spd-80); 
      } else myMotor->setSpeed(spd);  
    } else {      
      myMotor->setSpeed(0);  
      CarriageDir = !CarriageDir;  
    }
  } else {                              // Carriage Moving Left to Right
    if (Pos1 > 100) {
      myMotor->run(BACKWARD);
      if (Pos1 < 300) { 
       myMotor->setSpeed(spd-80); 
      } else myMotor->setSpeed(spd);  
     } else {      
      myMotor->setSpeed(0);  
      CarriageDir = !CarriageDir;  
    }
  }
}


This is the endstop sensor circuit.  I haven't wired it up to the Arduino as yet, but it is pretty straight forward. 


In the true nature of this project, I searched for a used motor controller to go with my Arduino .   Pictured here, is the Adafruit I2C Motor Shield V2 that was on my original robot.  This project will breath new life into it. 

This is a wonderful board in that it contains TWO dual h-bridge FET drivers for four DC motors, or two steppers, or one stepper and two motors... 


Wiring up the Optical Encoder.  Only four wires are needed...


12volt DC gear motor used to drive the carriage assembly.


References:

http://playground.arduino.cc/Main/RotaryEncoders#OnSpeed
http://reprap.org/wiki/Optical_encoders_01
http://mechatronics.mech.northwestern.edu/design_ref/sensors/encoders.html
http://forum.arduino.cc/index.php/topic,17695.0.html

My Reprap Prusa i3 Kit [ first of a multipart blog] - The unboxing!

$
0
0


I finally bit the bullet, and ordered an actual real 3d Printer from Aliexpress.com.  I've needed an actual functioning mechanical printer to finish my testing and calibration on the Printer firmware that I've been working on for several months now. 

The homemade rig that I cobbled together was not capable of the tolerances that my firmware and electronics could theoretically achieve.

I've put it off until now for many reasons:  Mostly because I'm pig headed and didn't want to admit that I'm not a mechanical genius....

Anyway, a few friends convinced me that this was the right way to go, to finish my ACTUAL project, which was the combination of electronics and associated software/firmware to support it.


The kit I ordered was from    Shenzhen Sunhokey Electronics Co., Ltd.

I must say that I was rather impressed with the speed in which this kit was delivered from China to Canada. From the time I ordered, it took about a business week to process the order, but once I received notification that the package had shipped, It was here with about 4 days.   Thank you Aliexpress.com


Without further ado, let's begin the unpacking:


The Fedex dude pretty much had a hernia dropping this little box at my door.  The packaging said 13.5kg, which is about 30lbs for you Americans... But it felt a lot heavier than that.  Must make a note to self to return (go?) to the gym.


I've removed the thick protective foam top that covered everything to show that this is indeed very well packaged.  


With the box containing the acrylic frame components removed, you can see the electronic and mechanical components nestled tightly within the foam.


The distributor even has little cutouts to cover the stepper motors and linear and threaded rods!


The aluminum bowden extruderwas pre-assembled to the stepper motor, and the machining on the hotend looks to be quite good.


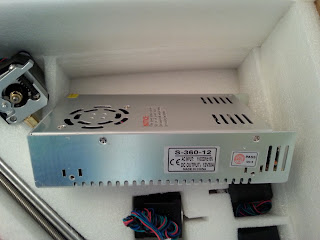
 The power supply is a beefy 12v 30A (360watt) unit.  

My only complaint, is that I was not aware that you had to specify North American AC adapter.  It comes, by default, with a European adapter.  


Yeah, I'm RTFM challenged, ok!?


The Controller board is a MKS Gen 2Z v1.1
This is basically a combination of the Arduino MEGA2560 plus a RAMPS1.4 board.  It still uses the A4988 stepper driver boards. 

Included in this kit is an un-named LCD display with SDCARD and a rotary encoder for menu selection. 


All of the frame components are cut out of clear acrylic. (With a nice pink protective layer... hmmm... should I leave that on? )


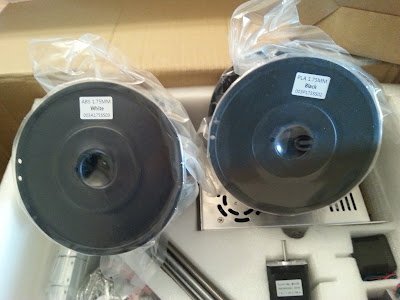
Also included were two 1kg spools of 1.75mm PLA to get me started.
I didn't request any particular colors, so I kind of expected something funky.  

They provided Black and White, which I'm quite happy about.


That's it for now.  

Later in the week, I'll begin assembling and documenting.  

Wish me luck!

My Reprap Prusa i3 Kit [ second of a multipart blog] - The Build!

$
0
0

This past weekend, I finally had the time to start building my Reprap Prusa i3 3D Printer,  which I ordered a few weeks ago from  Shenzhen Sunhokey Electronics Co., Ltd. onAliexpress.com


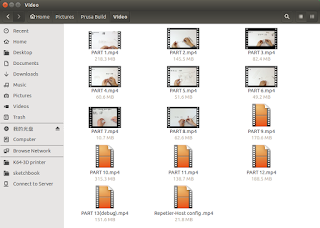
The kit came with a DVD which included about a dozen videos of the step-by-step assembly process.  There is no speech in the videos, just some background music, and periodic overlay of the hardware required to assemble each step.


The videos run at a fairly leisurely pace, but yes... I did have to pause them many times to keep up. 


Here's a sample video to show you what 

the process looks like.

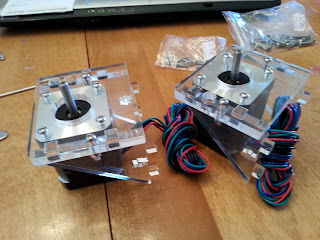
 The build started fairly smoothly, with the X-axis motor block and opposite belt tensioner slider assemblies. (Yeah, I'm too lazy to look up the official names of these two components)


My Assistant and fellow builder - Camden, found himself getting rather tired, early into the build! But, like a trooper, he put in a good couple hours.  Thank you Camden.


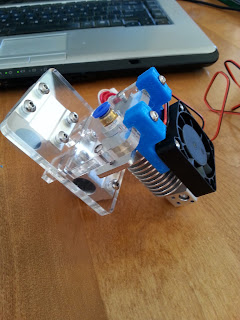
Next up, was the actual hotend carriage assembly.  I'll have to admit, it was very exciting to see these pieces built first.  Good jobShenzhen Sunhokey Electronics Co., Ltd.!  

At first, I wasnt sure how I would feel about the transparent acrylic frame and parts, but as the build progressed, I grew rather fond of it.


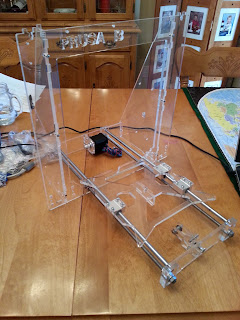
Next came Z-Axis Motor brackets, end stops, and then the frame and rails for the Y-Axis heated bed


I wrapped up for the weekend at this point.  Two days of "duration", and about 6 hours of "effort".   


The next three articles over the upcoming week will be: 

1) wiring all of the motors, switches, heaters, etc to the control board and firing it up.   

2) calibrating and troubleshooting (probably not in that order!)  

3) finally running a first print. 


Cheers.


Thermistor to Temperature conversion in ARM-mbed

$
0
0
This is a short article about how to quickly convert a Thermistor Value to Temperature on the Freescale (Now NXP) FRDM-K64F board.  Honestly, this code will work for any of the FRDM boards, as there is nothing specific to the K64F.

The FRDM-K64F developer board from NXP  (formerly Freescale) is a 32bit ARM® Cortex™-M4 core with DSP instructions and Floating Point Unit (FPU)running at 120 Mhz. It has 1M flash memory and 256k RAM.   It is compatible with most Arduino shields.

Add to this:
  •  FlexBus, 
  • 16 channel DMA, 
  • 2 16bit ADC, 
  • 2 16bit DAC, 
  • 3 analog comparators, 
  • CANbus, 
  • 3 SPI ports, 
  • 3 I2C ports, 
  • 6 UARTs, 
  • 1 Secure Digital Host Controller, 
  • Ethernet, 
  • Micro-SD card
  • Hardware CRC and random-number generator module, 
  • Hardware encryption supporting DES, 3DES, AES, MD5, SHA-1 and SHA-256 algorithms
  • 6-axis combo Sensor Accelerometer and Magnetometer

NXP/Freescale do have their own free IDE available, the Kinetis Design Studio that I've discussed here in the past. It is quite a rich and capable development platform, however with that richness comes complexity.  

For those less familiar with configuring hardware clocks and startup code for embedded processors, I suggest you look at the ARM-mbed platform.


ARM-mbed is a fairly good online IDE for working with various ARM based developer boards.


I was rummaging through my code today, and found this piece that I had struggled with last year when I was working on my 3D printer firmware.  I wanted to be able to read two thermistors, one for the extruder nozzle, and one for the heated bed.  These thermistors are used to regulate the temperature for accurate printing.

Several of the standard 3D printer firmware options (Marlin, Teacup, etc...)  that were developed for the 8bit Arduino platform used conversion tables to reduce the processing overhead. Because I was using a 32bit ARM processor at 120Mhz, I didn't feel that this was the right method to follow.  
Looking around, I quickly found out about the  Stenhart-Hart equation for converting Thermistor resistance values to Temperature values. 

It looked rather daunting at first, but then Adafruit came to the rescue with this awesome tutorial:


Anyway, with no further ado... here is my demo code for displaying Temperature values from a 16bit analog read of a 100k thermistor on the FRDM-K64F development board.


/*         FRDM-Thermistor-Demo
*  This is a Thermistor to Temerature conversion demo
*  for the @NXP (@freescale) FRDM-K64F demo board
*  Much thanks to @Adafruit for this tutorial:
*  https://learn.adafruit.com/thermistor/using-a-thermistor
*
*  The 100K Thermistor is configured with a 4.7k series resistor
*  tied to vcc (3.3v)  like this:
*
*   +3.3v
*     |
*      \
*      /  4.7k series resistor
*      \
*      /
*      |
*      .-----------O To Anlog pin on FRDM board
*      |
*      \
*      /
*  Thermistor  100k Nominal
*      \
*      /
*      |
*     ---
*   GND
*          
*
*********************************************************************/


#include "mbed.h"

#define THERMISTORNOMINAL 100000      // 100k
// temp. for nominal resistance (almost always 25 C)
#define TEMPERATURENOMINAL 25  
// The beta coefficient of the thermistor (usually 3000-4000)
#define BCOEFFICIENT 3950
// the value of the 'other' resistor
#define SERIESRESISTOR 4700   
 
AnalogIn Thermistor(A3);

Serial pc(USBTX, USBRX);


// This is the workhorse routine that calculates the temperature
// using the Steinhart-Hart equation for thermistors
// https://en.wikipedia.org/wiki/Steinhart%E2%80%93Hart_equation
float get_temperature()
{
    float temperature, resistance;
    float steinhart;
    int a;
   
    a = Thermistor.read_u16();       // Read 16bit Analog value
    pc.printf("Raw Analog Value for Thermistor = %d\r\n",a);
 
    /* Calculate the resistance of the thermistor from analog votage read. */
    resistance = (float) SERIESRESISTOR / ((65536.0 / a) - 1);
    pc.printf("Resistance for Thermistor = %f\r\n",resistance);
  
    steinhart = resistance / THERMISTORNOMINAL  // (R/Ro)
    steinhart = log(steinhart);                 // ln(R/Ro)
    steinhart /= BCOEFFICIENT;                  // 1/B * ln(R/Ro)
    steinhart += 1.0 / (TEMPERATURENOMINAL + 273.15);   // + (1/To)
    steinhart = 1.0 / steinhart;                // Invert
    temperature = steinhart - 273.15;           // convert to C

    return temperature;
}
  

int main()
{
    pc.baud(115200);   
    pc.printf("\r\nThermistor Test - Build " __DATE__ "" __TIME__ "\r\n");
 
    while(1) { 
       pc.printf("Temperature %f *C\r\n",get_temperature());

       wait(.5);
    }
}


References:
NXP.COM: FRDM-K64F Developer board
ARM-mbed: FRDM-K64F 
Adafruit: Using a thermistor to tell temperature 

I just received an Onion Omega!

$
0
0
Back in May of last year, I became aware of a KickStarter campaign for a new uController board called the  Onion Omega.
The Campaign met it's target goal of $15k USD, and then doubled it within a couple days!

Within a month, they had Successfully raised $267,851 USD with 4,459 backer.

What makes this little board incredible besides it's diminutive size, are it's enormous specs! 

  • Dimensions: 28mm x 42mm 
  • OS: OpenWRT Linux 
  • Processor: 400MHz32bit Broadcom Atheros AR9331
  • RAM: 64MB DDR2 
  • Flash: 16MB 
  • Wireless: 802.11 b/g/n 
  • Ports: 18 GPIO 
  • Language: Python, Node.JS, PHP, Ruby, Lua and more...


These  specs put this cool little board smack dab between the 8bit loveable Arduino and it's big 32bit brother, the RaspberryPi.

The 18 GPIO are  all digital, however there are I2C, I2S, and SPI buses for expansion should you require analog support.

The biggest "feature" of this awesome little board is the Web Interface!   The Onion Console is intended to represent a virtual desktop in your browser to control applications running on the Onion Omega!


How cool is THAT???

Anyway, cutting to the chase... A couple weeks ago, on Twitter,  @OnionIoT held a giveaway contest, and I entered... I mean, who wouldn't?  I've been working with embedded controllers and System on Chip boards for a while now, and this one definitely intrigues me. 

The following day, I received THIS tweet:
 YES!!!!   

And today finally, my board, plus a dock showed up!  


Now go away... I have some playing to do!   

Thank you Onion.io 


References:


Initial thoughts on creating a Mars Curiosity inspired Rover

$
0
0
It's been a while since I did any "robot" work.  I've been rather absorbed in my 3D Printer firmware.

I thought it was time I took a little side break, and kicked up something I've been thinking about for a while. 

I want to create an autonomous rover based on the concept of the Mars Curiosity Rover.    

No, it won't have a  radioisotope thermoelectric generator (RTG), nor will it have fancy bio-chemical analysis thing-a-ma-bobbers... 

But it will be cool! 


Requirements: 


Independent 6-wheel "rocker-bogie" suspension to allow it to crawl over fairly rough terrain unimpeded.

Neato XV-11 Wheel assembly


I happened to acquire a few Neato XV11 robot vacuums, 
and will be tearing them down for parts.  Each one has a pair of geared motors with optical encoders.  


A Teensy 3.2 will be used for each pair to ensure accurate positioning and velocity profiling. 
Teensy 3.2 for Motion Control

Neato XV-11 LIDAR sensor


The Neato XV-11 also has a very unique LIDAR system for mapping out room dimensions and identifying obstacles.


LIDAR mapping, A* Path planning, and Object Avoidance via multiple Sharp Infra-red proximity sensors will be done on a Raspberry Pi 3B
GPS, as well as a 9 degree of freedom fusion sensor on the chassis will also be managed by this Pi.


A* Path Planning


A Second Raspberry Pi 3B will be responsible for communications and streaming cameras. Running Nodebots, a javascript engine for Robot management, this Pi will have api's to allow connectivity via Android tablet, as well as a full web server.  


The 4 dof manipulator arm will be managed by another Teensy 3.2 and a separate 9 degree of freedom fusion sensor will sit on the wrist positional feedback.


I found on my previous rover, that another set of Infrared proximity sensors were needed on the bottom, front and back.  

Positioned on a 45 degree angle, these "cliff sensors" would alert you when the rover was in danger of falling over the edge of a cliff... ie, a set of stairs.


Similar to my previous rover, I will use a commercial 20,000ma Li-Ion power bank to power the electronics, and a separate Lead Acid 12v battery for the motors and servos.


I am also going to attempt foldable solar panels. Four panels, attached with hinges and servos, will fold away when not in use, but be able to extend off the back, fold out, and position for maximum light transfer when required. 


Any thoughts or suggestions are welcome as I embark on this awesome summer project.


References:

https://en.wikipedia.org/wiki/Curiosity_%28rover%29
http://www.instructables.com/id/How-to-Build-an-Internet-Controlled-Mars-Rover/
https://www.quora.com/What-are-the-reasons-behind-using-rocker-bogie-suspensions-in-mars-curiosity-rover
https://www.sparkfun.com/news/490
https://xv11hacking.wikispaces.com
http://www.nasa.gov/sites/default/files/atoms/files/mars_survival_kit_-_rover_final_4.pdf
http://arduino-pi.blogspot.ca/2014/04/adding-5dof-arm-to-my-autonomour-rover.html
https://www.sparkfun.com/products/242


Viewing all 47 articles
Browse latest View live